The thing worn
Since moving to a new flat last September wanted to make a dressing gown. The flat we lived in before we moved had 3 windows. We called this flat the 'cracker box,' as it was like a long, rectangular tube with no openings down either side. One window was at the front of the flat and was permanently curtained as it met a pavement that was populated 24/7 in the way only a pavement in London can be. The other two were tiny little windows at the back of the flat, both frosted and leading onto a walled yard. Though the flat had many downsides (like, um, only having 3 windows), one of the upsides was the level of privacy, which meant you could move about nude without offending anyone. The flat we've moved into is better in so many ways - it has separate rooms (incredible!), is sound proofed (what a luxury!) and also has not 3 but 14 windows. It's part of quite a densely spaced housing estate, where one of my favourite pass times is peering across into other people's flats to see what they're up to. The gaze goes both ways though, and my neighbours made me realise there was a dressing gown-shaped hole in my life.
I am a Seamwork magazine subscriber and the Almada robe pattern was on my radar as a possibility. I was inspired by Melissa's post about her wonderfully masculine version. But when I downloaded it and saw I would have to print out and piece together 52 pages of A4 paper to make the pattern, which was actually very simple, I decided to pull myself together and go pattern-free.
My boyfriend had given me this beautiful book about kimonos for Christmas. It's a hefty tome with some historical writing about Japan and the history of clothing, and tonnes and tonnes of jaw dropping photos of kimonos. It's a real treasure and an endless source of inspiration. I got it out to inform my ideas.
Before 1868, the garment we now call a Kimono was known as kosode, which means 'small sleeves.' This referenced the opening at the end of the sleeve, which was only just big enough for your hand to fit through.
From Around 794AD to 1185AD, kosode were worn as undergarments by the aristocracy and as everyday wear by commoners. From the 12th to the 16th century, as power shifted away from the aristocracy to a warrior class and then a merchant class, kosode became more deeply embedded as everyday wear.
By the end of the 16th century kosode was the main form of dress for everyone in Japanese society, irrespective of class or gender. Over these few hundred years kosode gradually came to be called Kimono, which literally means 'the thing worn,' which I guess just means 'clothes'!
The author states early on, "The form of the T-shaped, straight seamed, front-wrapping kimono has changed very little over the centuries." She goes on to explain that it's the surface decoration of a kimono - rather than the construction - that is the main point of interest and area for creativity, so the shape is almost just a standard base for interesting pattern design, incredible embroidery and interesting weaving.
The fabrics and surface decoration shown in the book are of course stunningly beautiful, but I found the simple construction inspiring too. After all, kimonos are just built of rectangles, and there is something magical about a garment that can look so impressively majestic though made of purely of straight lines.
Kimono are "made from lengths of cloth, cut across the grain, which drape over the shoulder and hang all the way down the body to the hem. A central seam down the back joins the two length of cloth, to which sleeves are attached. Separate piece of fabric are used to form the neckband and collar, and then the lining is added."
I hatched a plan based on some of the pattern layouts from the book. My robe (from hereon in I'm replacing 'dressing gown' with 'robe' as it's more fitting) would be made of:
- Two long rectangles to form the back (sewn together with the seam at centre back)
- Two long rectangles for the front (to be shaped by cutting away steep triangular slices at the neck)
- Two long skinny rectangles to form the neckband/collar
- Two chunky rectangles to make the sleeves
- Two small rectangles to form facing under the collar/neckband
- Two very long, very skinny rectangles to form a thick 'obi'-style waistband
I also added a skinny rectangle to go at the end of each sleeve as I wanted there to be a more significant amount of pink at the end of the sleeves than I had left in any one piece of fabric.

I've been making a conscious effort to use fabric from my stash for about a year, and I turned to some lurid floral sheeting I had picked up in Walthamstow. It's from one of my favourite shops there, New Fabric Shop (just a clever name) and I'd bought it as a couple of times in my life I've had the fleeting thought that it would be nice to make a duvet cover, then realised that most fabric isn't wide enough to do so. So, in shock that sheeting-width fabric was available on the high street, I bought it, and it's sat in my stash ever since.
I'd been toying with making a disgustingly sweet dress with pink, lavender and lime green lace, like something Marie Antoinette might wear if Luella Bartley had been around to design for her (I'm thinking especially of her Spring/summer 2009 collection)
But I've been aiming for greater intelligence with my sewing decisions, so in the spirit of realism, I decided to abandon my Versaille-on-acid fantasy and turn the sheeting into a robe.
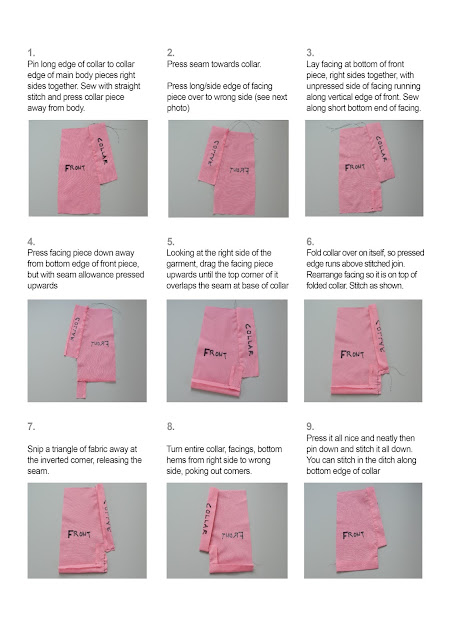
I won't go into detail about the construction of the whole robe as it's pretty self-explanatory, but I've made some step-by-step photos of how I attached the collar. I made it up as I went along, but I quite like how it turned out. Prior to where the steps begin below, I had:
- Joined 2 back pieces together at centre back
- Sewn both front pieces to back piece (right sides together) across shoulders
- Cut away slightly curved neck edge on back piece
- Sewn sleeves to main body piece
- Sewn front to back along bottom edge of sleeves and down each side.
Construction wise I'm pretty happy with the robe, though if I made another I'd add more width to the front pieces as they only just overlap. I'm not sure how, but hopefully I've got years to think about that. Also, I must remind myself to add pockets to all clothing I make.
Truthfully I'd never wear this fabric out of the house, so I'm basking in wearing something so sickly and almost grotesquely feminine indoors. It's made me want to make an outrageously over-the-top tracksuit for weekend lounging in some kind of deranged fabric that I couldn't walk the streets in.
Here you can see the guts of the robe a bit more clearly. To attach the waist ties, I unpicked a bit of the centre back seam, pushed their ends in then splayed the ends open and sewed them down with a rectangle of stitches.
Hopefully this picture helps if you plan on trying my neckband/facing/deep hem construction method. Also, if you have any ingenious suggestions for improving this process please do share. I pretty much only think construction through by physically making, and I'm one of those people that's generally too lazy to sample, so only got the one chance to have construction thoughts!
The back of the garment is traditionally the focus of kimonos, with most sketched designs only ever showing what the back would look like.
The back of my robe isn't particularly special, but I find it interesting to think about the back of a piece of clothing being it's aesthetic core, as I rarely give it much of a thought, probably because I never see it in the mirror!
The waist ties I made wrap from the back to the front, where they cross over, wrapping around to the back again where they're tied.
Lounging around at home is so much more graceful when you have your own robe, rather than just an old fluffy Star Trek one you borrowed from your boyfriend.
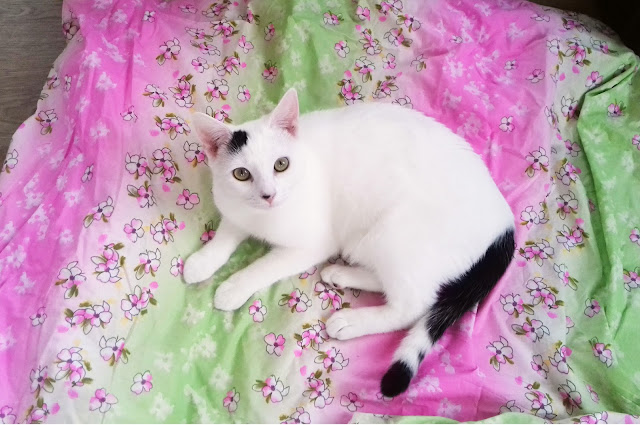
I wear my robe all the time and I'm proud of it as I feel I made a sensible decision to use the fabric rather than keeping it attached to a fantasy design that in fact had no where to go in the real world. Interestingly, making it has also made me recognise and relish the difference between indoor or 'private' clothes and outdoor or 'public' clothes, and the greater creative freedom that perhaps feels more available when your only sartorial audience is likely to be your two cats.


I love your robe - great construction and love the generous amount of fabric. I must look up that book - I read The Diary of Lady Muraski years ago and used be enthalled at her descriptions of the layered kimonos (all would be given titles) and it made the layering of colours and getting dressed in the morning like an art-form in itself. best of luck in your new home
ReplyDeleteThanks Eimear. That book sounds great. I read Memoirs Of A Geisha a few years ago and felt the same - the time and consideration that went into dressing - and the politics of kimonos - was unbelievable. Though clothing definitely deemed like 'trappings' I would say!
DeleteWhat a wonderful kimono, and a very interesting post. Thank you!
ReplyDeleteFascinating information I haven’t been experienced such information in quite a long time.
ReplyDeletehome office supplies