Construction revolution
I made the Marley Onepiece by Edgewater Avenue and I'm dusting the blog off to talk about process. It took a LOT of work and two toiles to get this swimsuit to a place wear it was wearable for me. I love the result so want to share my experience in the hope it may help others make the most of this cool design. I radically changed the construction process which has made this swimsuit viable for me. Honestly before I made this, I'm not sure I've ever come across a situation where a different construction process has taken a piece of clothing from unwearable to wearable. So, if you want to hear all about it, buckle up, cos I'm about to share a lot of detail!

To start, I did not intend to toile this garment. I bought some awesome leopard print lycra from Funki Fabrics which wasn't cheap and I optimistically assumed attempt one would work. The fit of the back bikini bottom is described in the pattern as 'cheeky' so straight off I drew a more modest fit - shown in the pic below. I just don't feel comfortable exposing my butt cheeks to the world.

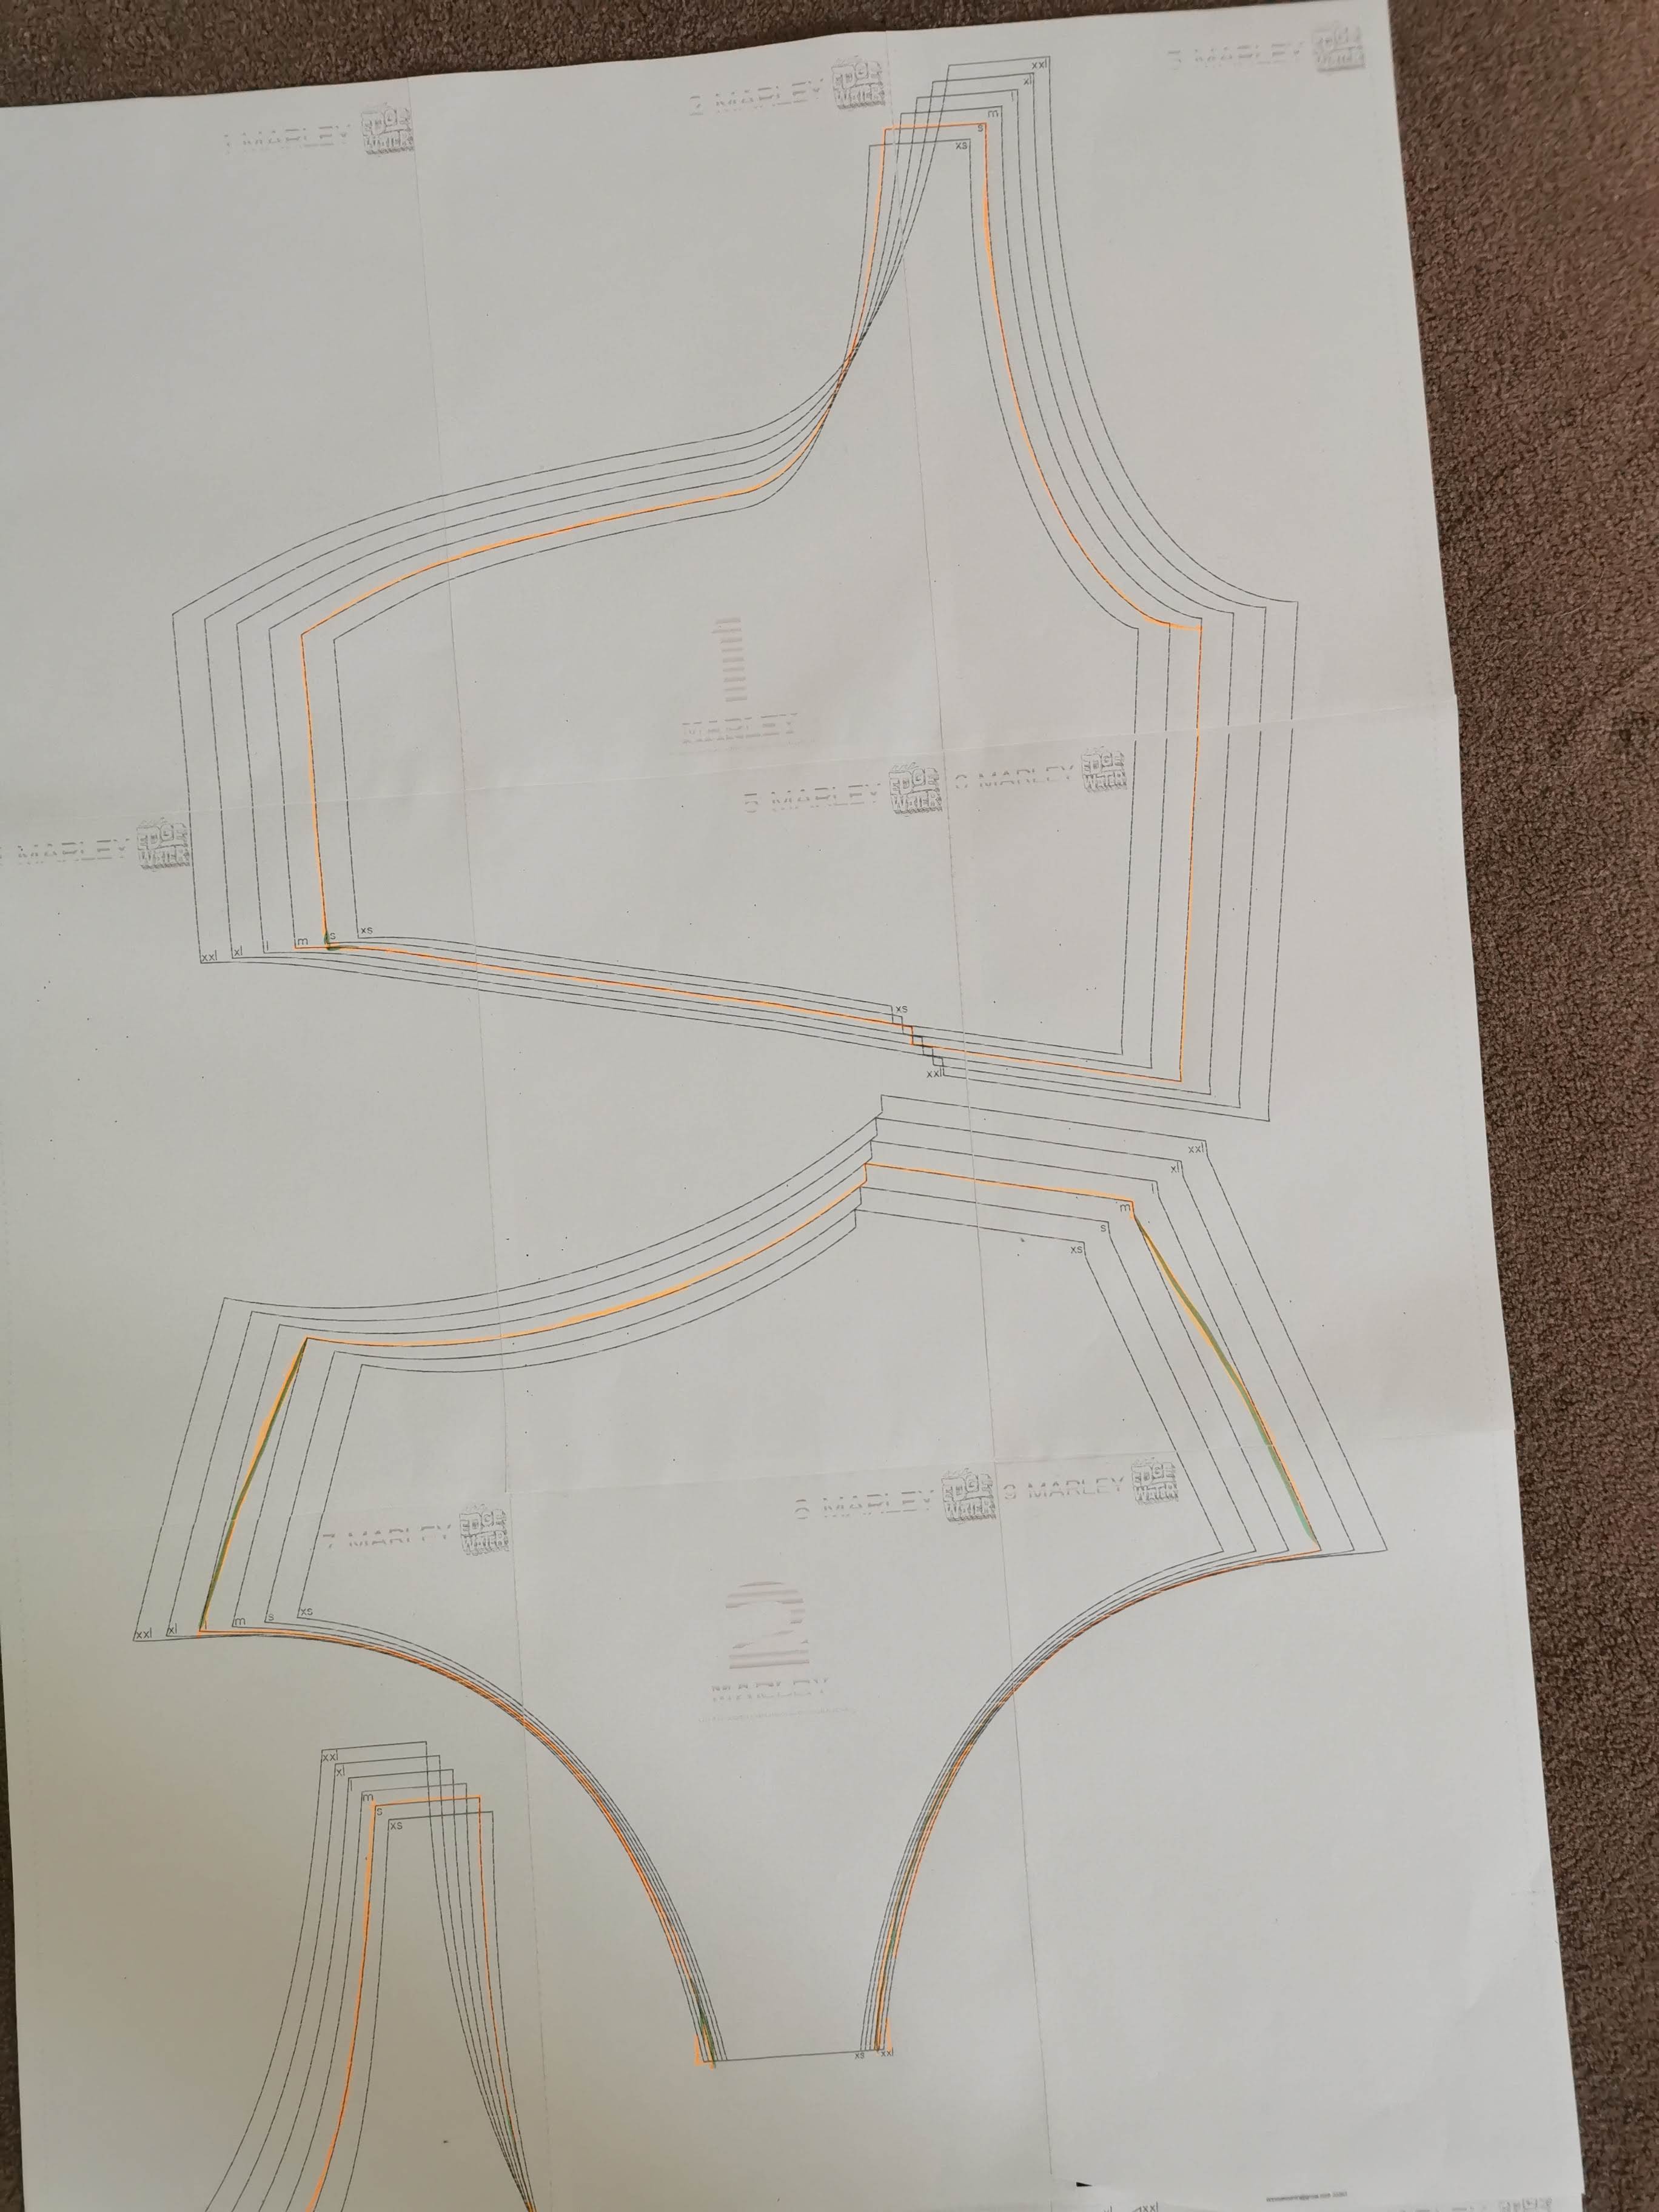
I have got a large bum for someone of my frame (no judgement but it must be acknowledged!), and the pattern instructions point out you can cut different sizes for the top and bottom of this pattern. I cut a small for the top in line with my measurements, and a large for the bottoms. Worth noting, my measurement suggested I cut a medium for the bottoms, but I compared an existing bikini I own and medium looked too small (It would have been).
The construction method the pattern and accompanying video advise on is a fully bagged out swimsuit, which makes it reversible. It's not something I've done before and was happy to try it. I found following along with the video helpful. However, this method has draw backs. Firstly, it really limits the scope for adjusting the shape of the garment. Once you've sewn it all up, you'd have to rewind many steps to make changes. I really appreciate fitting and adjusting as I go when I sew. I think it's one of the powerful elements of sewing. This just wasn't possible with this method, and hence when I did turn it out, try it on and it wasn't right, I felt pretty powerless. Secondly, it does lead to some really bulky areas, where elastic has been sewn in. A bagged out method normally leads to a lovely clean finish, but actually I found I hadn't achieved that just due to the sheer number of layers. It was also difficult to know how to approach sewing the area where the top and bottom meet. I kept re-sewing, unpicking and resewing. I didn't want to cut into the seams, as thought this could compromise the longevity of the garment, so this ended up pretty weird and lumpy.

I haven't actually got any pictures of what the first attempt looked like, as I went back in and added an extra gusset-type bit. I was disappointed that the upper edge of the bikini-bottom bit sat in a weird place in relation to my belly button just skimming underneath it. The whole suit felt like it was being dragged down, as if it wasn't tall enough for me and it made the proportions odd. This could well be because of the large size of my lower half compared with my upper half (the theory being my bum was dragging the whole suit down) but I'm pretty short at only 5ft 4 inches, so not sure. It might just be my personal view of what I thought the swimsuit should look like.
I decided to try adding a gusset.

This definitely made the rise (not sure if that's the right word) feel much more comfortable, but the amount of bum it exposed is frankly obscene. I absolutely wouldn't feel comfortable going out in public in this and feel slightly odd posting them on the internet, but I know you're here for the sewing so it's OK. I took these pics in our communal bin area when my neighbours were on holiday :) Looking at these pictures from afar, I don't think the swimsuit looks too bad, but it feels pretty shoddy. Also, because I cut the top a few sizes smaller than the bottoms because of my body's proportions, it's extremely difficult to wiggly my butt through the top bit, and I snapped some stitches doing so. If you're reading this and also have a much larger bottom than top half and want to make this, fear not, my final construction method solved this problem.

So, attempt one having failed, I started thinking about how I could construct the swimsuit differently for better results and more freedom and control throughout the making process. These are the rough instructions I wrote for myself. I decided to try constructing the front and back basically separately, bagging out just the cut-out bits, then joining front to back.
I drafted a new back bikini bottom piece, which you can see here. It's the semi-transparent layer in the middle, as this photo also shows the bottomsI drafted for attempt three! When I look at it now, it's not very much bigger than my first attempt (and wasn't big enough to give me the bum cheek coverage I was looking for).
So this is attempt two, which I made using some black offcuts from other projects. There is still waaaaay too much butt on display. I planned to finish all the edges of this in the fairly standard method of sewing elastic to the wrong side, then folding it back in on itself. This would use up more fabric than the method in the instructions. These edges are unfinished, but I decided not to proceed any further mostly because of the butt-coverage issue, but also because the size of the upper bikini bit would have reduced more than I wanted. What I discovered from this method was that when I sewed the front and back pieces together, it was difficult to get a smooth join, and despite my best attempts they're kinda stepped. This is a result of the construction process. I also still ended up not really knowing how to approach sewing the acute angle where top and bottom join, so this was still kinda lumpy and caught up.
So, back to the drawing board. I had a radical re-think. These are the frenzied scribbles I made to myself.

I then thought through the full process systematically, and wrote out these instructions for myself.

I re-drafted all the pieces this time, adding much more depth to the back bikini bottom pieces, and an extra 1cm depth to all top and bottom seam allowances.

For the process, I decided to get rid of bagging-out altogether. Each of the pieces is double layered, as I find that feels more reliable. I joined the front and back tops together, and the front and back bottoms together at the side that has the cut-out. Then I sewed tops to bottoms at the little horizontal strip, but the stitches sit at where the inner edge of elastic is (I hope this makes sense when you look at the pics below).

I thin stitched in one long piece of elastic on the wrong side, running all the way from the join front to back, going over the side seam. I did this on the top and the bottom edge of the gap, then turned the fabric in on itself covering the elastic, and stitched that down. All this with a small zig zag stitch.

I did this for a clean finish, but also to add strength to this seam, as this is the seam where the stitches popped when I made version one. This has been a success, as these edges feel really robust in my final swimsuit. Once I'd added this elastic, I sewed the front and back of the swimsuit together at the continuous side seam right sides together with my overlocker. At this point, all the edges remained unfinished, meaning I could try the swimsuit on and make any adjustments. I did that. I found I needed to slightly reshape the curve of the front lower bikini, so I just merrily trimmed away, did another fitting and was happy at the element of control I had built into the construction process!

Here's the whole swimsuit inside out, so you can hopefully see how I finished all the edges, with a standard method of stitching elastic to the wrong side then turning it and stitching down. This meant that unlike in the black toile, I was finishing each leg hole and the armhole as one continuous loop, so I created a nice smooth edge, rather than having a stepped edge where front met back.

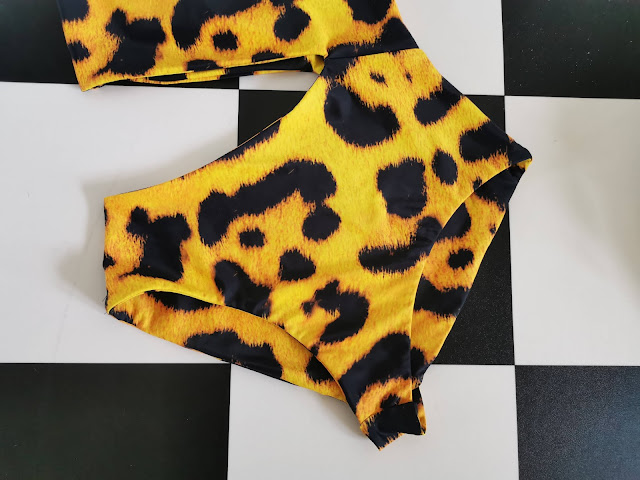
So, finally, a swimsuit I'm very happy with. There is a little bit of weird wrinkling/bagging at the back, around the seam that joins top and bottom, so if I make this again I will try and eliminate that. I'm really pleased with the acute angle where the top and bottom parts meet. It's a nice sharp corner and sits flat, rather than being a lumpy mess.

I do absolutely love this design, it's really easy to wear, and I am happy that I didn't walk away after the disappointment of my first attempt.

This fabric is also from Funki Fabrics, and I didn't know it was going to be neon green, it looked kinda snakey lizardy green online. But I am into the fluorescence.

Ever since I started sewing I have been pretty preoccupied with construction processes, but I honestly don't think until this I've understood what an extreme affect a construction method can have on a garment - on the experience of making it and on the finish too. Changing the construction process turned this from being a garment I felt powerless to adapt and tailor to my body, to one where I felt empowered.


If I make this agin, I think I will draft a slightly narrower shoulder strap, as I actually like the narrower width of that better on my original leopard print version.

I've written this as I hope it will be useful for other people wanting to make this brilliant design. So, if you would like to use my construction-method, but I haven't made it clear, please do let me know and I will attempt to explain better. Happy swimming!
This is such an insightful post! I love hearing about your process with the Marley Onepiece. It’s amazing how much difference construction can make, and it sounds like you really put in the work to make this design wearable for you. I’m sure your detailed experience will be super helpful for others who are tackling this project. Can’t wait to dive into the specifics and learn from your adjustments—thanks for sharing!
ReplyDeleteDenver Masonry
Nice Post
ReplyDeleteAbsolutely loved your post on the construction revolution! The insights on innovative techniques and sustainable practices are inspiring. It’s exciting to see how creativity can reshape the industry. Keep up the fantastic work—can’t wait to read more!
ReplyDeleteWholesale Casual Dresses
Very attractive dress. Embroidery Digitising Nice job.
ReplyDeleteYou might go into further detail on the Niagara Falls home builders near mepersonalization choices Apeiro Construction provides its customers. Do they offer customized solutions for various architectural types or certain requirements like connections with smart homes.
ReplyDeleteThis site features a detailed sitemap for construction-near-me services, making it easier for users to discover local professionals.
ReplyDeleteIts well-structured XML helps enhance local SEO and online visibility.
Perfect for those seeking trustworthy and timely construction solutions nearby.
If you're planning a building project or renovation, finding the right professionals matters. Check out
ReplyDeleteconstruction near me to connect with trusted local experts.
Reliable Construction Servicesdeliver quality workmanship, on-time project completion, and durable results you can trust for residential, commercial, or industrial needs
ReplyDeleteNellykini delivers premium swimwear with a modern Swiss vibe. The bikini designs and summer shorts are both stylish and comfortable 💙swimwear
ReplyDelete